Discovering a leak in ceiling can be a nerve-wracking experience. Immediate action is key to mitigating damage and preventing a small drip from turning into a costly disaster. This article provides clear, step-by-step guidance on how to quickly address a leak in ceiling, identify its source, and determine when it’s time to call in the professionals. Whether you’re faced with a sudden drip or a persistent stain on your ceiling, we’ll help you navigate the next steps toward a dry and secure home.
Key Takeaways
- Early detection of ceiling leaks is crucial, indicated by visual water stains, musty odors, and wetness or dampness to the touch, which demand immediate action to prevent extensive damage.
- Identifying the leak source involves investigating potential areas like the upstairs bathroom, the roof (checking for damaged shingles or gutter blockages), or internal plumbing, and may require professional assistance if complex.
- Temporary measures to manage a ceiling leak include containing the water with buckets and turning off water sources, while long-term solutions such as roof repairs, plumbing fixes, and preventive measures require professional expertise.
Decoding the Drip: Identifying Your Ceiling Leak
Ceiling leaks can sneak up on us, often making their presence known long after they’ve started. Early detection is vital to prevent extensive damage and further complications. But how do you spot a leak before it becomes a home disaster? The answer lies in keen observation and understanding the clues your house gives you.
We’ll examine the signs that indicate a ceiling leak—visual cues, musty smells, and tactile evidence.
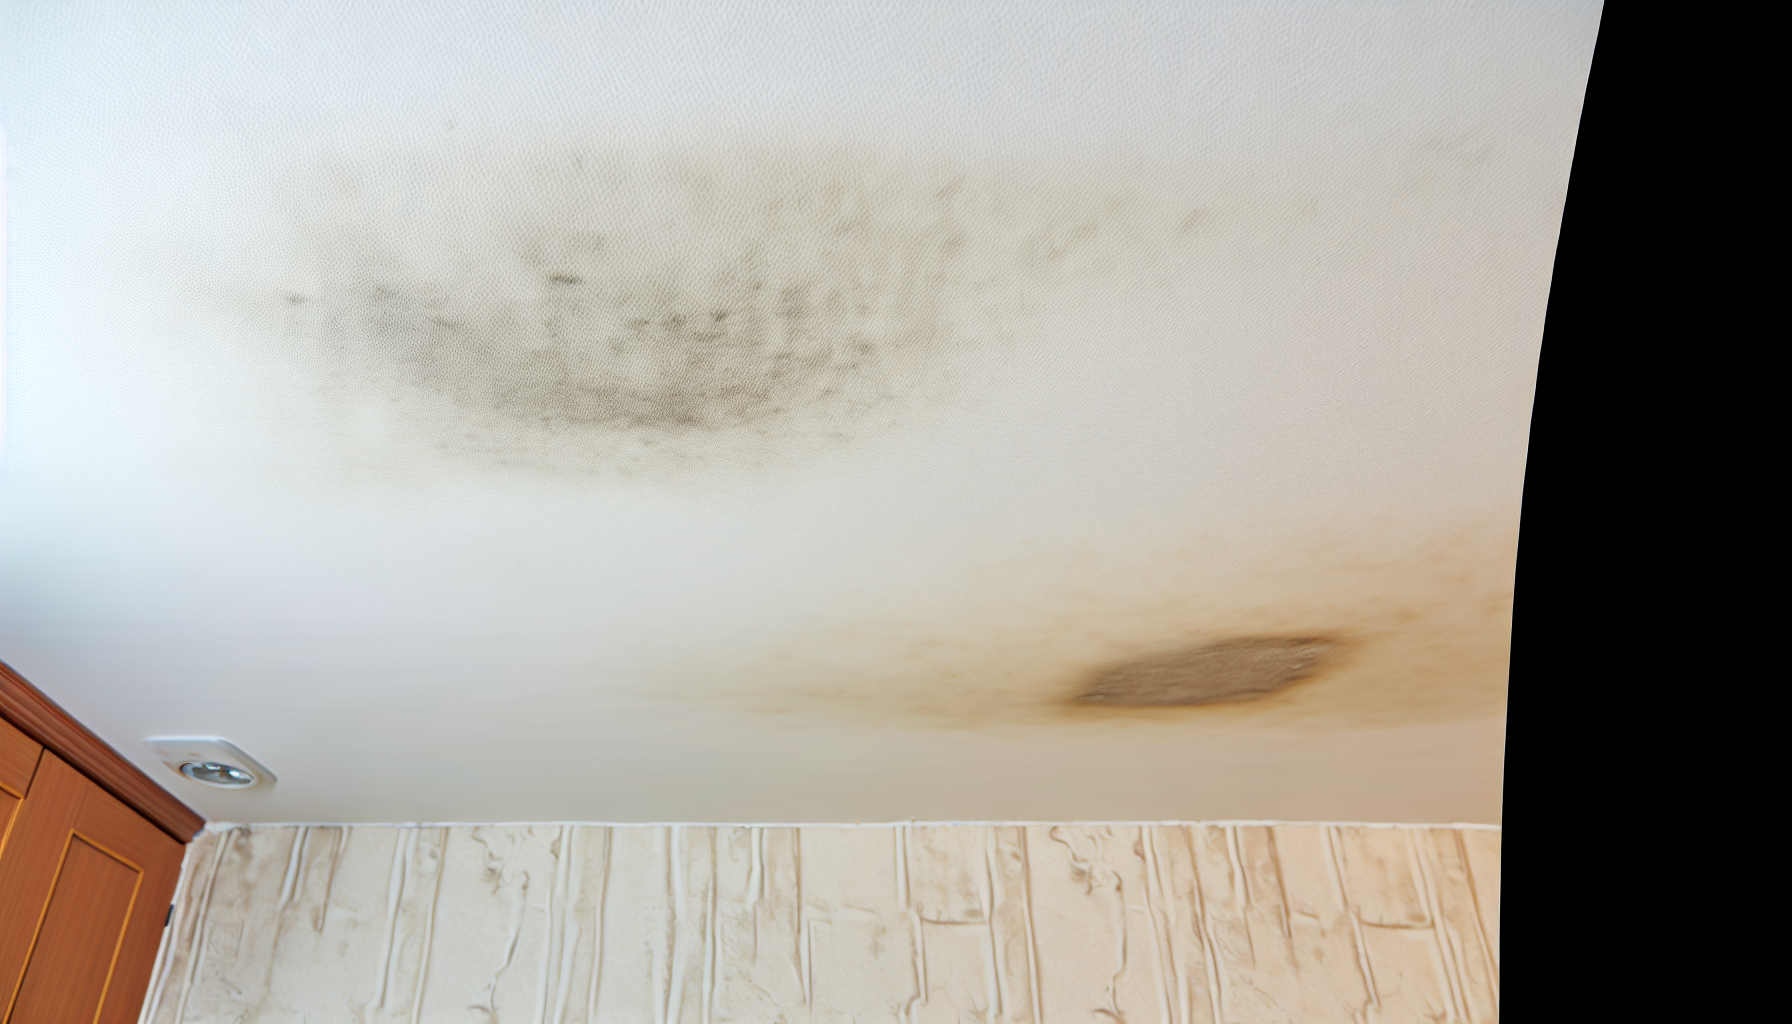
Visual Clues: Spots and Stains
The first sign of a ceiling leak is often a water stain or discoloration on the ceiling. Stains can come in any shape or size and are often brown, copper, yellow, or rusty in color, making them quite noticeable against white or light-colored ceilings. If you notice signs like peeling paint or cracks resembling spider webs, it’s a clear indication that water is compromising the integrity of your ceiling.
Don’t ignore these visual clues; they demand immediate action.
The Smell Test: Detecting Mustiness
Along with visual cues, your nose can help you detect a ceiling leak. Musty or smelly odors often accompany water damage, indicating the possible presence of mildew that thrives in damp environments. These musty smells are a common sign of mold growth, a frequent culprit in areas that are damp, dark, and warm—conditions often found when there’s a ceiling leak. If you start sniffing out something musty, it’s time to take action.
Tactile Evidence: Wetness and Dampness
Sometimes, the clues aren’t always visible or smellable. This is where your sense of touch comes into play. Feeling the ceiling for wetness is a reliable method for detecting a ceiling leak, especially in the early stages when a leak may not be visually apparent.
Even in the absence of visible signs like water stains or peeling paint, your hands can confirm a leak if the ceiling feels damp. Trust your senses—they can be crucial in identifying a ceiling leak.
Tracing the Trail: Locating the Source of the Leak

Once you’ve identified a leak, the next step is to trace it back to its source. While it’s tempting to place a bucket under the dripping water and call it a day, this is only a temporary fix. To really solve the problem, you need to find where the water leaking is coming from. This could range from plumbing issues to roof problems, and finding the source can sometimes feel like a game of detective.
Rest assured, we will lead you through the investigation process, commencing upstairs, transitioning to the roof, and finally scrutinizing the internal fixtures.
Upstairs Investigations: Checking Showers and Plumbing
If you have a bathroom directly above the leak, it’s a good place to start your investigation. Dampness that doesn’t go away after rain, wet cabinet bases below sinks, or wet areas around tubs or showers could indicate a plumbing-related ceiling leak. Even a small shower leak can cause ceiling damage, mold growth, and increased water bills.
Don’t overlook the possibility of a brittle and cracked rubber gasket under the shower drain or a leaking shower due to a clogged drain caused by soap scum or hair build-up on your bathroom floor. These seemingly small issues can lead to a big problem if not addressed promptly.
Roof Reconnaissance: Inspecting Shingles and Gutters
After checking the upstairs, the next place to inspect is your roof. Look for signs of raised, damaged, or missing shingles, which could be potential leak entry points. Keep an eye out for other exterior causes of a leaking roof, such as cracked flashing or improperly sealed valleys that may lead to roof leaks.
Don’t forget to inspect the gutters for obstructions that could cause overflows into the attic. Ensuring they have a slope of at least a quarter-inch drop per 10 horizontal feet can prevent water buildup and leaking into the ceiling.
Internal Inquiries: Examining Pipes and Fixtures
Internal plumbing leaks can be particularly tricky to detect, but they’re a common culprit of ceiling leaks. Start by looking for water leaks, especially in the form of a leaking ceiling, which can be marked and examined with a moisture detector to identify potential leaks.
Examine the attic’s underside of the roof for wetness to find the starting point of a leak’s path stemming from internal plumbing issues. If the issue is complex or challenging to diagnose, don’t hesitate to call a professional plumber to find and fix the cause of the leak.
Immediate Measures: What to Do When Water Is Leaking

So, you’ve found the leak. What now? Well, while temporary fixes and professional help are on the way, there are immediate measures you can take to minimize the harm. These include containing the water and shutting off water sources. By doing these, you can prevent water from spreading across your floor or causing further damage.
We’ll detail the steps to contain the cascade and halt the flow.
Contain the Cascade: Catching Dripping Water
Damage control is key when dealing with ceiling leaks. Here are some steps to follow:
- Place a bucket or large bowl on top of towels directly underneath the leak to collect water.
- If the water is spreading, use plastic sheeting, thick towels, or a plastic tarp to cover the floor and furniture, funneling collected water into containers and absorbing any spillage.
- Remember to regularly empty the containers to prevent overflow.
- Use a wet-dry vacuum to quickly remove any accumulated water.
Halting the Flow: Shutting Off Water Sources
If the water leak is severe, it may be necessary to shut off your home’s main water supply to stop the flow of water. However, remember that this is a temporary measure and won’t solve the underlying issue. After shutting off the water, open a faucet on the lowest level to drain remaining water from the pipes, which can help mitigate the leak until it’s fixed.
Remember, the goal is to limit damage until professional help arrives.
Temporary Tactics: DIY Fixes for Small Leaks
While immediate measures are essential, they are not a permanent solution. However, there are some temporary fixes you can employ for small leaks while you’re waiting for professional help. These tactics include sealing minor leaks and redirecting water flow. It’s important to remember, though, that these are only temporary solutions and may not be suitable for all situations.
We’ll explain the methods for implementing these temporary fixes.
Patchwork Solutions: Sealing Minor Leaks
For minor leaks, a patch kit could be a quick, temporary fix. You can apply the compound over the leak, place a patch on top, and allow it to dry to seal the leak temporarily. Alternatively, epoxy and tape can be applied to temporarily fix leaking water pipes. Remember, these are just temporary solutions and won’t fix the underlying issue.
Diverting Disaster: Redirecting Water Flow
In addition to sealing leaks, another temporary tactic is to divert the water away from valuable items. Use buckets or other containers to strategically catch drips and direct water away from valuable items and areas that could be damaged by water. If the leak is on the roof, a large tarp can be sprawled over the leak’s vicinity on the roof, overlapping the edges of the leak, to prevent further water ingress.
While these measures won’t stop the leak caused by ice dams, they can help minimize damage until help arrives.
Long-Term Remedies: Professional Repairs for Ceiling Leaks

While temporary fixes can buy you some time, professional repairs are necessary for long-term solutions. Experts can address the root cause of the leak, ensuring that your home is safe and protected from future leaks. Whether it’s roof and flashing repairs or plumbing services, calling in the professionals is a step you shouldn’t skip.
We’ll elucidate the necessity of professional help and its scope of work.
Mending the Membrane: Roof and Flashing Repairs
The roof is your home’s first line of defense against the elements, so keeping it in top shape is crucial. For roofing repairs, professionals have the necessary equipment and adhere to safety protocols, making them the best choice for the job. They can replace missing or damaged shingles, check for and repair wood deck damage, and install new shingles.
They’re also equipped to handle more complex issues like cracked flashing or improperly sealed roof valleys, ensuring a comprehensive solution to your properly sealed roof leak problem.
Plumbing Prowess: Engaging a Professional Plumber
When it comes to plumbing leaks, professional plumbers are your best bet. They’re trained to assess leaks, especially in hidden areas like behind walls or underground, using specialized equipment to accurately detect the problem. Professional plumbers can discern small leaks which may be symptomatic of larger underlying issues in the plumbing system, helping to circumvent extensive and costly repairs or replacements down the line.
For leaks that are challenging to diagnose or entail intricate repairs, the skills of a professional plumber are essential, especially when dealing with leaking plumbing.
Reinforcing the Roof: Preventive Measures Against Future Leaks
Prevention is better than cure, and this is especially true when it comes to ceiling leaks. Taking proactive steps can help reinforce your roof against future leaks and maintain its integrity. Regular checks by professionals can identify potential issues early on, preventing serious leak problems. They can design a maintenance plan tailored to delay significant roofing repairs and address minor leaks quickly, offering long-term protection.
Remember, thorough repair work, which avoids cutting corners, can strengthen the roof against leaks and add value to your home.
Assessing the Aftermath: Dealing with Water Damage and Mold Growth
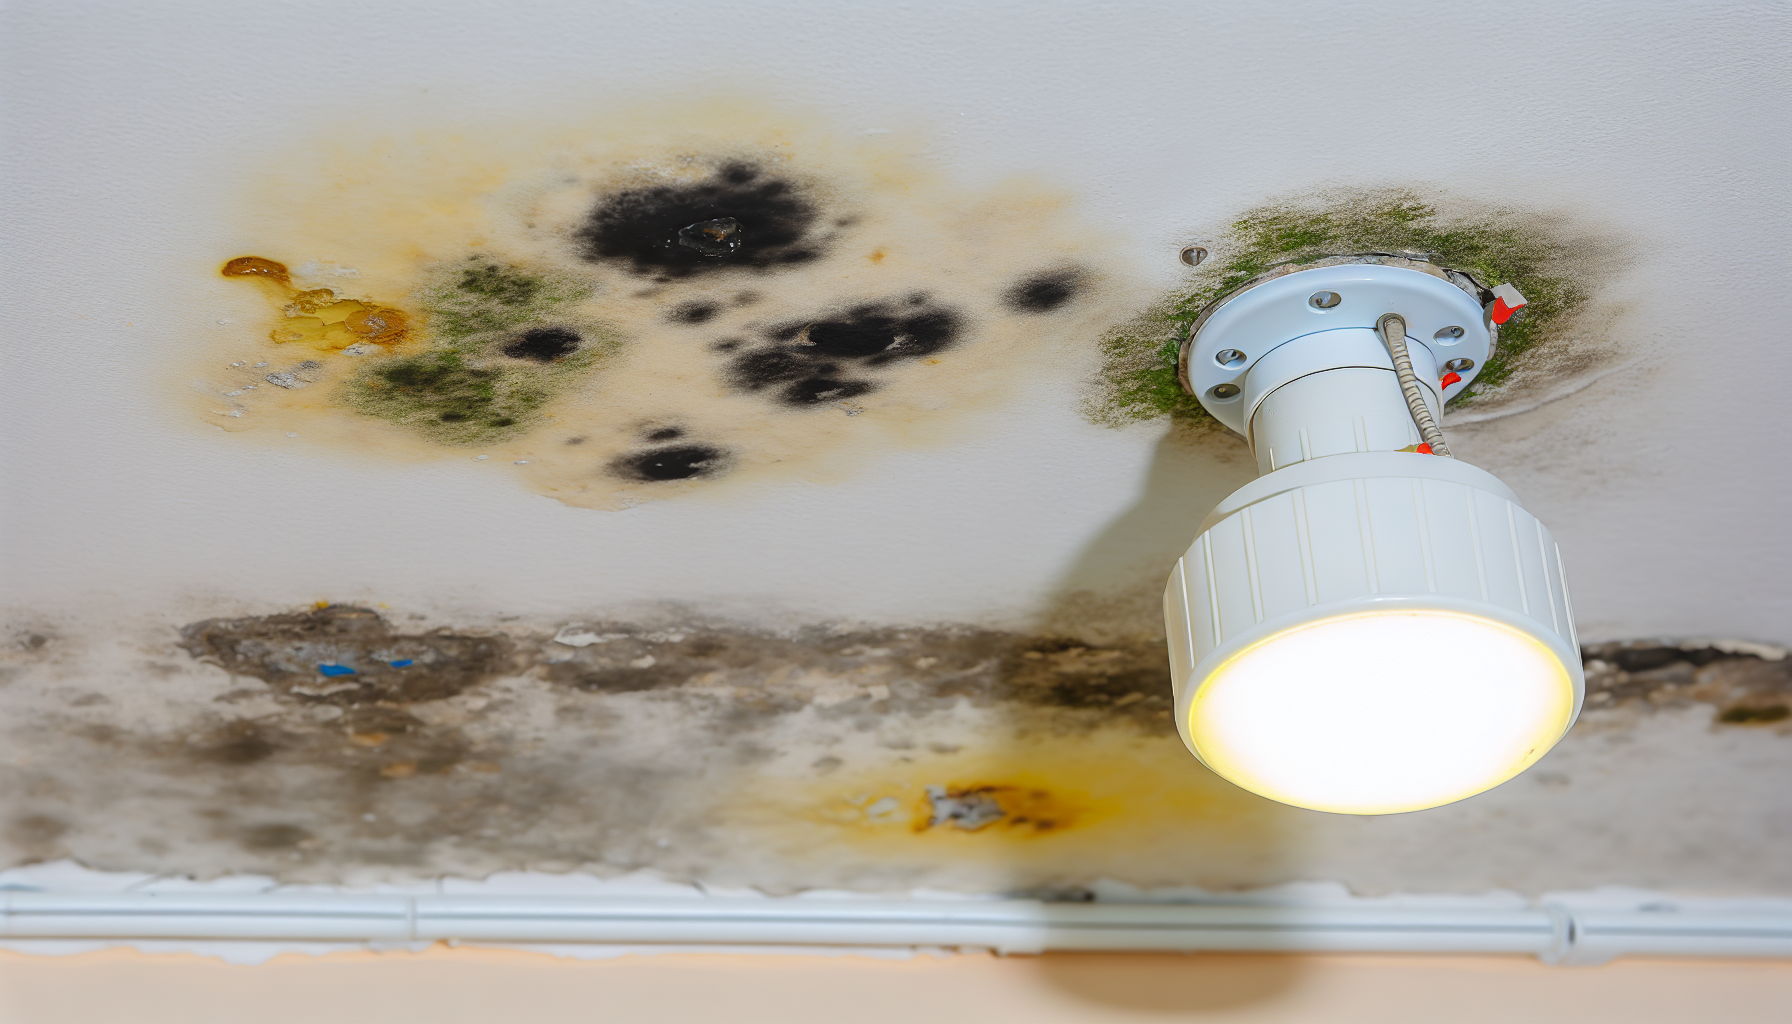
Once the leak has been addressed, it’s time to deal with the aftermath. Leaks can leave behind water damage and mold growth, both of which need to be addressed promptly to prevent further damage and health issues. It’s essential to remove moisture and repair ceiling damage to restore your home to its pre-leak condition.
We’ll explore effective ways to handle water damage and mold growth.
Dry-Out Strategies: Removing Moisture
Preventing mold growth is crucial after a leak, requiring thorough drying of all wet areas. Here are some methods to help minimize moisture levels and expedite the drying process:
- Use dehumidifiers to draw in warm, moist air and circulate cooler, drier air.
- Use fans to enhance airflow and promote faster drying.
- For larger leaks, consider hiring water damage restoration professionals who can utilize industrial fans and mold-prevention chemicals as part of the drying and restoration process.
Restoration Roadmap: Repairing Ceiling Damage
Repairing ceiling damage is a crucial part of the restoration process. Signs such as bubbling, sagging, or bulging areas on the ceiling indicate significant water damage that needs addressing. The damaged drywall needs to be cut away, and the area needs to be smoothed with sandpaper to prepare it for the application of new drywall or patching materials.
Once new materials are installed, the ceiling must be primed and painted, plus perform tasks like patching as necessary to restore the ceiling’s appearance.
When to Wave the White Flag: Knowing When to Call a Professional
While it’s tempting to try and fix everything ourselves, there are times when it’s best to call in the professionals. This is particularly true for leaks, which can be complex and potentially dangerous if not handled correctly. Whether the ceiling is sagging and appears to be at risk of collapse, or the plumbing issue cannot be pinpointed, professional help is invaluable.
We’ll outline the scenarios when it’s prudent to call a professional.
Beyond DIY: Recognizing the Need for Expertise
Determining when to call a professional can be as simple as recognizing when a situation is beyond your expertise. If the source of a plumbing-related ceiling leak cannot be found or if it requires technical procedures like roof flashing replacement and repair, it’s time to call a professional. Remember, professionals have the training and tools necessary to safely and effectively address the issue.
Safety First: Considering the Risks of DIY Repairs
Safety should always be your top priority when dealing with ceiling leaks. Roofing work, in particular, is inherently dangerous, and performing DIY repairs can be risky due to the height and complexity. DIY plumbing repairs also carry the risk of exacerbating problems if you don’t have experience with drywall and plumbing systems, potentially leading to more extensive damage or personal injury. When in doubt, it’s always safer to call a professional.
Summary
We’ve walked through the process of identifying and addressing ceiling leaks, from the first signs to professional repairs and preventive measures. While dealing with a ceiling leak might feel overwhelming at first, remember that with the right knowledge and assistance, it’s a problem that can be solved. Whether you’re dealing with a small leak or a major one, don’t hesitate to call a professional when necessary. Your home is worth it.
Frequently Asked Questions
Is a ceiling leak an emergency?
Yes, a ceiling leak is an emergency because it can lead to slip and fall accidents and requires immediate attention to prevent further damage and ensure safety. It’s important to address the issue promptly to avoid any potential hazards.
How do I find the source of a leak in my ceiling?
If your ceilings are sagging, bowing, or dipping, they may be laden with water, leading to a potential leak. Additionally, if you’re smelling mold or mildew growth or seeing visible mold, it may indicate excess water and the source of the leak.
How do you treat a ceiling after a water leak?
To treat a ceiling after a water leak, start by locating and stopping the water source, then dry the ceiling, remove damaged parts, repair the ceiling, and finally, paint it. This will help restore the ceiling to its original condition.
Can my ceiling collapse from a leak?
Yes, a leak can cause your ceiling to collapse due to the increased weight and pressure from accumulated water. Be sure to address any leaks promptly to prevent potential structural damage.
Roof is leaking?
Call a professional roofer as soon as possible to address the leak, as delaying the repair will only make the problem worse. Professional expertise is essential for a successful roof repair.